Lesson Planning with Me

Hello! I teach an integrated preschool classroom, which means I am responsible for students ages three to five with special needs of all types as well as typical developing students. My students range in ability from a toddler to a typical kindergartener. Therefore, my activities must be able to reach a wide range and be easily adjusted for multiple ability levels.

I created this blog as a way to keep track of the fantastic ideas I have gathered over the years. Because I just randomly add activities to the blog, use the search, standard list, or theme list on the left side to find the activities you are after!

I also create and sell resources that can be found at TeachersPayTeachers and Teacher's Notebook.

Friday, December 30, 2011

Iceberg Treat

From: 2 Teaching Mommies

This week we are learning all about the Polar Lands!  One distinctive feature of the any polar area are the icebergs. 

IMG_7816
This “iceberg” dessert doesn’t require much and definitely isn’t as many calories as our “snowball” treat. Although it may be just as sweet.  Just make sure you allow enough time for Jell-O to set.
IMG_7798
Here is what you’ll need: 
  • 1 box instant blue Jell-O
  • whip cream
  • water
  • cups to set Jell-O in for each person
Serves 4
To make this “Iceberg” dessert, just follow these easy steps:
Step 1:
Step 2:
IMG_7800 IMG_7802
Boil a cup of water and add it to your Jell-O powder mix.
Stir until dissolved.
Step 3:
Step 4:
IMG_7803 IMG_7809
Add a cup of cold water.
Pour mixture into individual clear (plastic or glass) cups.  Then refrigerate, until set. This will be your ocean.
Step 5:
Step 6:
IMG_7832 IMG_7829
Then have your kiddo add a little bit of whip cream to the top to create your iceberg.
EAT and ENJOY!

Thursday, December 8, 2011

Snowman Soup

From: DLTK

This is a really simple stocking stuffer to make.   If you go the extra mile of making a snowman mug to go with it, you end up with a really sophisticated gift that a child could do, but even a grownup would be proud to give.

Instructions:

Arrange the following ingredients in a small gift bag or basket or in your home made snowman mug:
  • 1 individual pack hot chocolate mix (or enough scoops of mix to make a cup)
  • 2 Hershey's chocolate kisses (eyes)
  • 4 chocolate chips (mouth)
  • 5-10 mini-marshmallows
  • 1 small candy cane or cinnamon stick
Print the gift tag to go with the gift.

Christmas Shape Sort

Shape Sort:  Divide a file folder into 4 columns and place a die-cut rectangle, circle, square, and triangle at the top of each column.  Provide students with picture cards of Christmas items to sort into the appropriate column.
Circle - cookie, wreath, candy. lollipop, ball, ball ornament
Square - different types of gift boxes, block, cookie
Rectangle - different types of gift boxes, cookie
Triangle - Christmas tree, cookie

Thursday, November 17, 2011

Sharing Salad


Ingredients: brown sugar cones or waffle cones, raisins, Cheerios, grapes, apples, bananas, Chex cereal *optional* strawberry yogurt*.

Directions: Cut the apples and bananas into bite size pieces. Mix the Cheerios, Chex, raisins, and fruit in bowl. Have the children come to you in small groups and help you stir the “Sharing Salad”. Put a scoop of the salad into each “cornucopia” (cone) and place on a plate. If you think your students won’t eat the salad you might want to try mixing it with strawberry yogurt first. I have found that most of my students will eat it if the fruit is covered in strawberry yogurt. If your students are able to bring the ingredients for the salad it is even more meaningful. We use this activity in place of the more traditional and controversial Thanksgiving Feast.

Sunday, November 6, 2011

I Know an Old Lady Who Swallowed a Pie


Setting: Small Group, Literacy Centers

Objective: Oral language, storytelling, sequencing

Book: I Know an Old Lady Who Swallowed a Pie

Materials: blackline master of Old Lady Who Swallowed a Pie, construction paper, blackline master of foods the Old Lady eats in the story, crayons or markers, X-acto knife, tape, Pringles can.

Directions: Tape a piece of construction around a Pringles can. Copy, color, and cut out a blackline master of the Old Lady from the story. Attach the old lady to the can with tape. Use the X-acto knife to cut a hole through the blackline and the can where the Old Lady’s mouth is. Next, copy and color the pictures of the food the Old Lady eats in the story. Cut the pictures out and have students re-tell the story by “feeding” the old lady the pictures through the hole in her mouth.

Feed the Turkey


Setting: Small Group, Math Centers

Objective: Number Sense

Materials: empty Pringles cans, tape, brown construction paper, Sharpie marker, X-acto knife, colored construction paper for feathers, scissors, glue stick, unpopped popcorn kernels.

Directions: Cover each Pringles can with brown paper and secure with tape. Cut turkey bodies from the brown paper and attach to the front of each Pringles can with tape. Cut feathers from the colored construction paper and attach to the back of each turkey with glue stick or tape. Cut through the turkey’s mouth and can using the X-acto knife. Write one number on each turkey with a Sharpie. Place the un-popped popcorn in a pie pan or bowl. Place the Pringles can turkeys and the pan of popcorn at a table and have students count the correct number of kernels into each turkey’s mouth.

Feed the Turkey


Setting: Small Group, Literacy Centers

Objective: Alphabet Recognition

Materials: Turkey Beanie, magnet, glue (hot or E6000), magnet, magnetic letters, recording sheet (not pictured), Do-A-Dot markers.

Directions: Glue a magnet to the turkey’s nose using a glue gun, E6000, or similar. Give each child a recording sheet with the alphabet on it. Next, place the magnetic letters in the middle of the table, you could use a bowl or plastic container to hold them. Students will take turns holding the turkey and helping him “eat” the magnetic letters as pictured at left. When the turkey “eats” a letter the students may locate it on their recording sheet and mark it with a Do-A-Dot marker. You can find the upper and lowercase turkey alphabet recording sheets in the Thanksgiving Literacy Packet located in the printables section below.

Saturday, November 5, 2011

Comparing Numbers


For comparing numbers to 10 I give kids individual number cards and they build their number with unifix cubes and compare their tower to the partner next to them. They have to say something like "I have 6 cubes and David has 2. My tower is bigger. My number is more." David might say, "My number is less." This builds their academic vocabulary and is great "math talk."

Number Knowledge


Monday, October 17, 2011

Dinosaurs!

Creating lap books, or folders like this one, gives your children or students a chance to play with the activities over and over again.  Also, when you send home activities, parents get the opportunity to not only see what you are doing in the classroom, but become better acquainted with the skills their children should have!

The activities that are found in this dinosaur folder can be found here.

However, I gathered my favorites below:

http://www.1plus1plus1equals1.com/Dinosaur_Train_ABC.pdf

http://www.1plus1plus1equals1.com/Dinosaur_Train_My_Name.pdf

http://www.1plus1plus1equals1.com/Dinosaur_Heads_and_Tails.pdf

http://www.1plus1plus1equals1.com/Dinosaur_Sizes_and_Puzzles.pdf

http://www.1plus1plus1equals1.com/Dinosaur_Counting.pdf

http://www.1plus1plus1equals1.com/Dinosaur_Puzzle.pdf

Saturday, September 17, 2011

Kumon Workbooks

They have cutting, handwriting, mazes and many more...

Pumpkin Lapbook

I gathered ideas for this lapbook from several sources.

Use green 12" x 18" construction paper.  Place paper horizontally and fold sides in to meet in the middle.  On the front, you could have your child/student create a pumpkin patch with their fist and orange paint.

Ideas for inside:

Torn art pumpkin (middle)


Pumpkin patterns (big/little)

Pumpkin song (on the back)

Pumpkin Concentration (in a baggie)

Friday, September 16, 2011

Tangled Pumpkin

From: I Can Teach My Child

This is a very simple way to make a fun, homemade fall decoration (and get some fine-motor practice in too).  
There is one thing that I would suggest when doing this activity–use orange yarn!  I only had yellow yarn, so I just added some orange paint, which worked fine…it was just a really big mess.  Thank goodness we did it outside!  But as usual, the product is worth the process!

Here’s what you’ll need:  yarn (preferably orange), glue, waxed paper, and orange paint (if not using orange yarn).

1.  Mix the glue, paint, and a tiny bit of water.  I didn’t measure…I just put mostly glue with enough paint to make it bright orange.  Freehand draw the outline of a pumpkin on a piece of waxed paper and lay on a cookie sheet (or similar-sized tray).

2.  Dump the glue/paint mixture onto a flat surface.

3.  Start your child off by laying the yarn into the paint and then putting the yarn on top of the outline.  Don’t cut the yarn, just continue unrolling as you need it.

4.  Let your little one coat some of the unrolled yarn in the glue/paint mixture until fully covered.

4.  Drape the yarn on the inside of the outline until it looks like a tangled mess.  While still on the waxed paper, let it dry (it took ours 2 full days)!

Once dry, peel off the waxed paper and display for all to see!  You can even hang it!

Letter Boxes

From: I Can Teach My Child

Making letter recognition meaningful for preschoolers is crucial.  Getting your child to automatically recognize letters is great, but children will retain information much more once they have had a variety of experiences with those letters.  Making it fun and multi-sensory will ensure that they are understanding what they are learning.


1.  Here’s what you’ll need:  baby food containers (or other small containers) and letter stickers.  If you don’t have letter stickers, you can just use a sharpie and write the letters on the containers.
2.  Let your child put the letter stickers on each box. 
3.  Go on a scavenger hunt and start filling them!  Opening and closing the boxes is a great fine-motor practice.  This also services as a learning opportunity for sizes–whether things are too big or too little to fit in the boxes.

C for car…
and carrot!
4.  Continue with the other letters. 
5.  A shoebox would be a great place to keep the containers.  Empty them out every so often and let your child have a new adventure looking for things that begin with each letter.

*A variation of this activity for 5+ years could also include looking for letters in newspapers and magazines.

**Use caution when using these boxes around younger siblings (babies) who put small items in their mouths.  These should be put away in a safe place, away from reach of tiny fingers.

Apple Theme Sensory Tub


We had a great time with this sensory tub this morning.  The oatmeal is a great texture!  Big Brother, who typically flitters from one thing to another every 5 minutes, spent 40 minutes just playing with the sensory tub!  And the only reason he stopped is because Little Brother woke up from his nap and we had to go inside to get him.  I’m all about simple, engaging versatile fun!

You may want to opt to make this an outdoor activity.  If you do this inside, I would recommend putting a vinyl shower curtain liner underneath your children so that when they are done, you can just wad up the liner and shake it off outside.  

Here’s what you’ll need:  a large tub of oatmeal, measuring cups, and apples with numbers written on them.
Use an egg carton.
Line up the numbers and have them identify them.

Animal Mix-Up Legos


This little activity was super easy and the boys Big Brother loved it!  Little Brother has had a fever (again!) yesterday and this morning, so he is CRANKY!  Nothing pleases that child today.
Here’s what you’ll need:  Legos, packing tape and pictures of animals fit to size.  You can download the one I used here…it fits our 2.5″x1.5″ (2 combined) Lego Duplos.


1.  Put 2 of your Legos together and measure their combined length and width.

2.  Print off pictures to size.  You can download mine here.

3.  Cut each animal in half…not a real animal, the picture of the animal.  For Heaven’s sakes, I don’t want to be contacted by PETA.

4.  Tape each on the legos.

Make sure to line them up if they don’t fit your Lego exactly.  Rinse and repeat for the other animals.  Okay, don’t really rinse…just repeat.

5.  Scatter the pieces on the floor.

6.  Let your child match the top to the corresponding bottom.

Saturday, September 3, 2011

Plant a Pumpkin Seed...Watch It Grow


Pumpkin Seedling From: Informed Democracy

Whether it is Spring or Fall, it is easy and fascinating to plant pumpkin seeds indoors and watch them sprout into seedlings. It takes 8-10 days for a pumpkin seed to become a young plant. For most of that time, the seed is growing down and producing roots. On about the 7th day, two fat, fuzzy, oval baby leaves break through the soil. Within a few more days, a third leaf, with wrinkles and jagged edges, appears in the center of the young plant. Here's what you will need to make a root view chamber.
MATERIALS:
(1) Potting soil
(2) Pumpkin seeds
(3) Half gallon milk carton
(4) acetate (overhead transparency) or clear plastic
(5) Waterproof glue
(6) Wooden block or book.
 
DIRECTIONS:

1. Cut off top of milk carton; rinse the carton with soap and water.
2. Cut a "window" flap on one side of the milk carton, leaving flap attached at the bottom. The flap should be about half an inch in from the edges of the container. Leave the flap attached at the bottom so the roots can be covered when not observed.
3. Cut acetate or plastic for a "window". Place inside carton and glue.
4. Loosely pack moist potting soil to one inch below the top of the "window". Plant one seed, flat side against the top center of the "window" about 1" deep.
Root View 
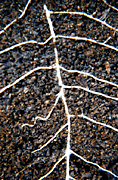
5.Place a 1" block or book under the back bottom edge of the milk carton so the "window" tips toward the ground. This encourages the roots to grow close to the window for easy viewing.
6. Keep "window" flap closed except when viewing roots. Check soil each day, making sure it is moist but not soaking. When the seed sprouts and grows above the soil, keep container (but not roots) exposed to daylight.
7. Use a journal to record changes. Make a time-lapse drawing using a different colored pencil each day.

Sunday, August 28, 2011

Pumpkin Poem

From: DLTK


One day I found two pumpkin seeds.
I planted one and pulled the weeds.
It sprouted roots and a big, long vine.
A pumpkin grew; I called it mine.
The pumpkin was quite round and fat.
(I really am quite proud of that.)
But there is something I'll admit
That has me worried just a bit.
I ate the other seed, you see.
Now will it grow inside of me?
(I'm so relieved since I have found
That pumpkins only grow in the ground!)

Friday, August 26, 2011

Portfolio Ideas

I take pictures of each of the children in each center, through out the year. I then tape them on a sheet of paper that tell about that center and the importance of it in their child's growth process.  I spiral bound the papers and then they have a booklet to keep from preschool.

or

Each month, beginning with the first month, children draw their self-portraits. At the end of the year the pages are bound and the cover is titled "Look How I've Grown!" This is a great way to show parents progress.

Saturday, August 6, 2011

Five Senses Poem

I found this poem here.

If a bird you want to hear,
You have to listen with your __­­________.
If you want to dig in sand,
Hold the shovel in your __________.
To see an airplane as it flies,
You must open up your __________.
To smell a violet or a rose,
You sniff the fragrance through your __________.
To bite and chew or scream and shout,
To eat or talk you use your __________.

Depending on the ages/abilities of your students or children, you can ask them to write in the appropriate body part, or cut and paste a picture of the body part.

Saturday, June 4, 2011

Guess Who?

Each day, put one student's name (mixed-up) on a magnetic surface using magnetic letters. Have the students see if they can figure out who's name it is before Morning Meeting/Circle Time. Once someone guesses the correct answer, have that student come up and put the letters in the correct order. Then use their name to reinforce letter identification.

Math Pocketchart Activity

From The Virtual Vine:

  For my students who are working on number concepts to 10, I like to keep up a pocket-chart activity for them to use. Usually the activity coordinates with whatever theme /unit that we're working on . Cut (6) 3x5 index cards in half and program with the numbers 0 - 10. Using the Ellison machine die-cuts, cut out 55 dies.

  Line the numbers up in random order at the left edge of the pocket chart, vertically. Have the students count out the correct number of dies and place them in the row beside the number. An alternate activity would be to place the die-cuts in the rows and have the students count them and place the correct numbers in the pocket chart.

Letter Assessments

From: Making Learning Fun

Print the page of your choice. Have the children color it. Individually
take the children aside and have them identify the letters. If they get the letter right, stamp it with a bingo marker. Leave the letters that they get wrong blank.

You can also use dot stickers instead of bingo markers. If you don't have the appropriate colored stickers, you can lay any circle stickers out on newspaper and spray paint them the color you need.

Other assessment pages available include:

Apple
Baker
Baseball
Bat
Big Green Monster
Butterfly
Chicka Chicka Boom Boom
Chicken
Christmas
Dinosaur
Fireman
Fishing
Flower
Frog
Gingerbread Man
Graduation
Ground hog
Jack and Jill
Ladybug
Mail Carrier
Mrs. Wishy Washy
Old Lady Who Swallowed a Chick
The Old Lady Who Swallowed a Fly
Old Lady Who Swallowed a Shell
Penguin
Pirate
Pumpkin
Rabbit
Racecar
Scarecrow
Seahorse
Snowman
Spiders
St. Patrick's Day
Train
Turkey
USA
Valentine
Valentines Day
Witch for Halloween


Friday, June 3, 2011

Question of the Day

Every Friday, at attendance time, put up question: "Does your name have a(n) (letter) in it?" with "yes" and "no" as the responses using the letter of the week.

Thursday, June 2, 2011

Beginning of Year Bulletin Board

Chicka Chicka Boom Boom theme:

Make a coconut tree and use an Ellison machine to put the first letter of each child's name around the tree. On each letter, write the child's name. The bulletin board reads: "Chicka Chicka Boom Boom, Look Who's in Our Room." Take a picture of each child on the first day of school. When developed, have the child find his/her name by the tree. Tape the photo next to the letter and save it for their portfolios when the board is changed.

Monday, May 30, 2011

Journal Ideas

*Read a story. Ask the children a comprehension question and write down the response. Then ask the child to draw a picture illustrating his/her response. Copy the cover of the book on one side of the paper and allow the child to draw on the other.

*Take a picture of the child doing something in the classroom. Ask him/her to dictate what he/she was doing.

*Copy an action picture (or comic) onto a sheet of paper. Ask the child to dictate a story to go along with the picture.

*Choose your own ending: Begin reading a story aloud to your child. Then just before the end of the story, stop reading and tell your child that she is going to create her own ending for the story. Provide an example by adding another sentence to the last one you read. Then invite your child to continue telling the story so that it concludes any way she likes.

*Cover ideas:
1. Letter stamps: sponge letter paint stampers with paint or letter stampers and an ink pad
2. Letter stickers: both upper- and lowercase
3. Pre-cut letters: kids find, arrange in order, glue to page