
Sunday, September 25, 2011
Saturday, September 17, 2011
Pumpkin Lapbook
I gathered ideas for this lapbook from several sources.
Use green 12" x 18" construction paper. Place paper horizontally and fold sides in to meet in the middle. On the front, you could have your child/student create a pumpkin patch with their fist and orange paint.
Ideas for inside:
Torn art pumpkin (middle)
Pumpkin patterns (big/little)
Pumpkin song (on the back)
Pumpkin Concentration (in a baggie)
Friday, September 16, 2011
Tangled Pumpkin
From: I Can Teach My Child
This is a very simple way to make a fun, homemade fall decoration (and get some fine-motor practice in too).
 There is one thing that I would suggest when doing this activity–use orange yarn! I only had yellow yarn, so I just added some orange paint, which worked fine…it was just a really big mess. Thank goodness we did it outside! But as usual, the product is worth the process!
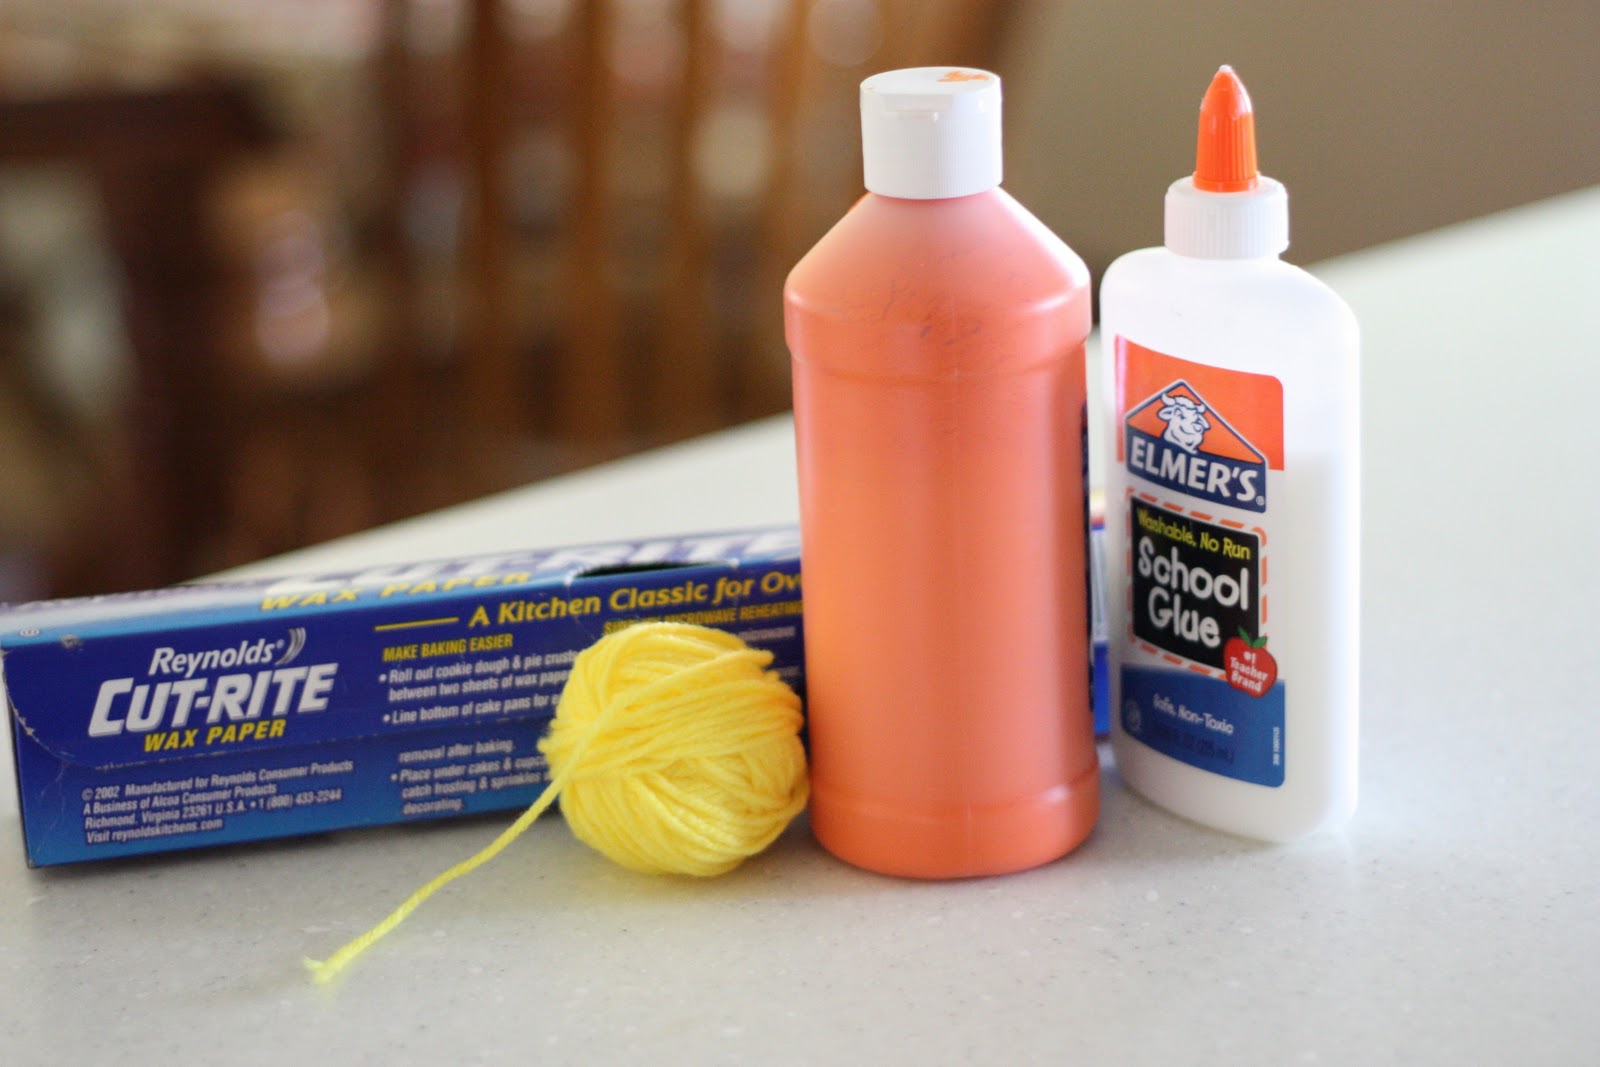
Here’s what you’ll need: yarn (preferably orange), glue, waxed paper, and orange paint (if not using orange yarn).

This is a very simple way to make a fun, homemade fall decoration (and get some fine-motor practice in too).

Here’s what you’ll need: yarn (preferably orange), glue, waxed paper, and orange paint (if not using orange yarn).
 |
| 1. Mix the glue, paint, and a tiny bit of water. I didn’t measure…I just put mostly glue with enough paint to make it bright orange. Freehand draw the outline of a pumpkin on a piece of waxed paper and lay on a cookie sheet (or similar-sized tray). |
 |
| 2. Dump the glue/paint mixture onto a flat surface. |
 |
| 3. Start your child off by laying the yarn into the paint and then putting the yarn on top of the outline. Don’t cut the yarn, just continue unrolling as you need it. |
 |
| 4. Let your little one coat some of the unrolled yarn in the glue/paint mixture until fully covered. |
 |
| 4. Drape the yarn on the inside of the outline until it looks like a tangled mess. While still on the waxed paper, let it dry (it took ours 2 full days)! |
 |
| Once dry, peel off the waxed paper and display for all to see! You can even hang it! |
Letter Boxes
From: I Can Teach My Child
Making letter recognition meaningful for preschoolers is crucial. Getting your child to automatically recognize letters is great, but children will retain information much more once they have had a variety of experiences with those letters. Making it fun and multi-sensory will ensure that they are understanding what they are learning.

 2. Let your child put the letter stickers on each box.
 3. Go on a scavenger hunt and start filling them! Opening and closing the boxes is a great fine-motor practice. This also services as a learning opportunity for sizes–whether things are too big or too little to fit in the boxes.
C for car…
 and carrot!

Making letter recognition meaningful for preschoolers is crucial. Getting your child to automatically recognize letters is great, but children will retain information much more once they have had a variety of experiences with those letters. Making it fun and multi-sensory will ensure that they are understanding what they are learning.

1. Here’s what you’ll need: baby food containers (or other small containers) and letter stickers. If you don’t have letter stickers, you can just use a sharpie and write the letters on the containers.


C for car…


4. Continue with the other letters.
5. A shoebox would be a great place to keep the containers. Empty them out every so often and let your child have a new adventure looking for things that begin with each letter.
*A variation of this activity for 5+ years could also include looking for letters in newspapers and magazines.
**Use caution when using these boxes around younger siblings (babies) who put small items in their mouths. These should be put away in a safe place, away from reach of tiny fingers.
Apple Theme Sensory Tub
From: I Can Teach My Child
We had a great time with this sensory tub this morning. The oatmeal is a great texture! Big Brother, who typically flitters from one thing to another every 5 minutes, spent 40 minutes just playing with the sensory tub! And the only reason he stopped is because Little Brother woke up from his nap and we had to go inside to get him. I’m all about simple, engaging versatile fun!
You may want to opt to make this an outdoor activity. If you do this inside, I would recommend putting a vinyl shower curtain liner underneath your children so that when they are done, you can just wad up the liner and shake it off outside.


Animal Mix-Up Legos
From: I Can Teach My Child

Here’s what you’ll need: Legos, packing tape and pictures of animals fit to size. You can download the one I used here…it fits our 2.5″x1.5″ (2 combined) Lego Duplos.
 |
| 1. Put 2 of your Legos together and measure their combined length and width. |
 |
| 2. Print off pictures to size. You can download mine here. |
 |
| 3. Cut each animal in half…not a real animal, the picture of the animal. For Heaven’s sakes, I don’t want to be contacted by PETA. |
 |
| 4. Tape each on the legos. |
 |
| Make sure to line them up if they don’t fit your Lego exactly. Rinse and repeat for the other animals. Okay, don’t really rinse…just repeat. |
 |
| 5. Scatter the pieces on the floor. |
 |
| 6. Let your child match the top to the corresponding bottom. |
Saturday, September 3, 2011
Plant a Pumpkin Seed...Watch It Grow
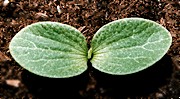 | From: Informed Democracy Whether it is Spring or Fall, it is easy and fascinating to plant pumpkin seeds indoors and watch them sprout into seedlings. It takes 8-10 days for a pumpkin seed to become a young plant. For most of that time, the seed is growing down and producing roots. On about the 7th day, two fat, fuzzy, oval baby leaves break through the soil. Within a few more days, a third leaf, with wrinkles and jagged edges, appears in the center of the young plant. Here's what you will need to make a root view chamber. |
| MATERIALS: (1) Potting soil (2) Pumpkin seeds (3) Half gallon milk carton (4) acetate (overhead transparency) or clear plastic (5) Waterproof glue (6) Wooden block or book. | ||
| DIRECTIONS: 1. Cut off top of milk carton; rinse the carton with soap and water. 2. Cut a "window" flap on one side of the milk carton, leaving flap attached at the bottom. The flap should be about half an inch in from the edges of the container. Leave the flap attached at the bottom so the roots can be covered when not observed. 3. Cut acetate or plastic for a "window". Place inside carton and glue. 4. Loosely pack moist potting soil to one inch below the top of the "window". Plant one seed, flat side against the top center of the "window" about 1" deep. | ||
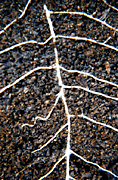 5.Place a 1" block or book under the back bottom edge of the milk carton so the "window" tips toward the ground. This encourages the roots to grow close to the window for easy viewing. 5.Place a 1" block or book under the back bottom edge of the milk carton so the "window" tips toward the ground. This encourages the roots to grow close to the window for easy viewing. 6. Keep "window" flap closed except when viewing roots. Check soil each day, making sure it is moist but not soaking. When the seed sprouts and grows above the soil, keep container (but not roots) exposed to daylight. 7. Use a journal to record changes. Make a time-lapse drawing using a different colored pencil each day. | ||
Subscribe to:
Posts (Atom)